Automate project creation with Xcodeproj
In this post, I’d like to show you how to automate the tedious process of creating flavors in an Xcode project.
Default way
Typically, when you create a new project, you start by creating Schemes and Configurations. This requires you to click all these things in Xcode. Of course, this is not a problem when you have to create one project and then forget about it. But if:
- your company has multiple starting projects,
- you want to keep the same convention,
- you want to delegate this task to a less experienced teammate,
then this solution might be useful.
What is Xcodeproj?
As documentation states:
Xcodeproj lets you create and modify Xcode projects from Ruby.
Script boring management tasks or build Xcode-friendly libraries.
Also includes support for Xcode workspaces (.xcworkspace),
configuration files (.xcconfig) and Xcode Scheme files (.xcscheme).
In short, Xcodeproj removes the need to configure the project using the GUI.
Prerequisites
Before we begin, I assume you have:
- Ruby on your Mac
- Installed cocapods - if not, head to https://cocoapods.org/
- Flutter or Xcode project with Cocoapods to work on
The provided article was written using the Flutter project. Some commands and directories may differ from the native approach.
[sudo] gem install xcodeproj
To start working on the project create ruby file in root ios project and then open in your favourite IDE. For example:
touch my_script.rb
code my_script.rb
First steps
The first thing we should configure is to import the libraries and run a file named .xcodeproj from within our script.
require 'xcodeproj'

project = Xcodeproj::Project.open('path/to/project/Runner.xcodeproj')
From now on, the project variable will be used to perform operations on our target project.
Build Configuration
List all configurations
During a new project configuration, I start my work by configuring the appropriate Configurations that I will then assign to the Schemes.
Our initial state looks like in Figure 1.

From xcodeproj we can easily get a list of available configurations in the project
project.build_configurations.each do |configuration|
    puts configuration.name
end
To run script we simply type
ruby my_script.rb
And here is the effect:
Debug
Release
Profile
Duplicate existing configurations
At this point you can go in the direction of creating your own Configuration, separate from those present in the project, or duplicate an existing one. To avoid errors, we will duplicate our configurations as we would normally do in the Xcode IDE.
def copy_configuration(project, base_name, new_config_name, symbol_name)
    runner = project.native_targets[0]

    new_configuration = project.add_build_configuration(new_config_name, symbol_name)
    new_native_configuration = runner.add_build_configuration(new_config_name, symbol_name.to_s)

    source_configuration = runner.build_configurations.detect {|element| element.name.downcase == symbol_name.to_s}

    new_native_configuration.base_configuration_reference = source_configuration.base_configuration_reference

    project.build_configurations.each do |configuration|
        if configuration.name == base_name
            new_configuration.build_settings = configuration.build_settings
        end
    end

    runner.build_configurations.each do |configuration|
        if configuration.name == base_name
            new_native_configuration.build_settings = configuration.build_settings
        end
    end

    project.save()
end

copy_configuration(project, 'Debug', 'Debug-new', :debug)
copy_configuration(project, 'Profile', 'Profile-new', :release)
copy_configuration(project, 'Release', 'Release-new', :release)
Looking at the above piece of code, you may notice the copy_configuration method which takes the following parameters:
- a
projectobject to add new configurations - the
base_nameis the name of the configuration to copy new_config_namewhich is the name of the future new configurationsymbol_namewhich is the name of the symbol indicating the type of the new configuration (debug or release)
In the method itself, we do the following
- We search for the Native Target to which we will add the configuration - in the case of Flutter configuration it will be the first one on the list -
Runner - We want our new configuration to be available both throughout the project and in Target, so we’re adding it in two places. In the
add_build_configurationmethod we put our new name and our symbol (which can be:debugor:release) - The next important step is to copy the corresponding
base_configuration_reference- this is a reference to the. xcconfigfile. In my project I have three such files -Release.xcconfig,Debug.xcconfigandGenerated.xcconfigand they are available for viewing in theios/Flutterfolder. In the near future we will only be interested inRelease.xcconfigandDebug.xcconfigas these are the ones we will be assigning to the appropriate configurations.
To find the appropriate .xcconfig file I use the detect method which will search for a build config that has either Release or Debug in its name (matching is done by the symbol which will be :debug or :release)
- In the last step I plug in
build_settingsfor the configuration created in the project and in the Target. This is done by a loop which looks for the name of the base configuration from which we want to take the settings. Then I assign the found settings to the appropriate configuration. - the last step in the method is to save our configurations in the project
I call the method I wrote earlier specifying respectively:
- project object,
- the name of the configuration we want to duplicate,
- the name we want to give to the new configuration,
- the symbol - it can be
:debugor:release. If we want to duplicate “Profile” we have to give it a symbol as:release.
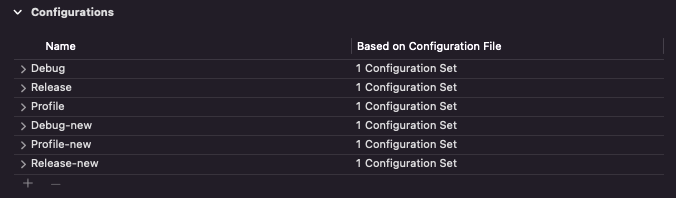
Aaand that’s it! After executing the script, we can view the effect of our work in Xcode.
Schemes
The next step we can take is to use the generated configurations. In order to do so, we will create a new scheme using code and then assign build configs to appropriate actions. We now add a new piece to the code we created earlier
scheme = Xcodeproj::XCScheme.new
debug_conf_name = 'Debug-new'
profile_conf_name = 'Profile-new'
release_conf_name = 'Release-new'
new_scheme_name = "Custom Scheme"
project_path = 'path/to/project/Runner.xcodeproj'
runner = project.native_targets[0]
scheme.add_build_target(runner)
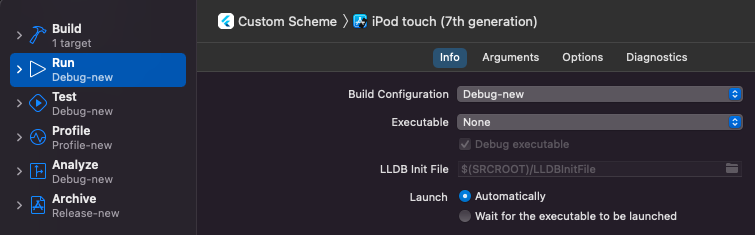
scheme.launch_action.build_configuration=debug_conf_name
scheme.test_action.build_configuration=debug_conf_name
scheme.profile_action.build_configuration=profile_conf_name
scheme.analyze_action.build_configuration=debug_conf_name
scheme.archive_action.build_configuration=release_conf_name
scheme.save_as(project_path, new_scheme_name)
- I create a new
XCSchemeobject and declare variables with the names of the configs that I want to add to it. - The Scheme object will require a Target, so I choose the first and main
Runner. - one by one, I specify which configs should be assigned to which action in this Scheme
- I save the Scheme by specifying the path with the project file
.xcodeproj.
Now we can view the saved Scheme in Apple’s IDE. In case you had Xcode open, you will have to open it again to refresh the Scheme list.
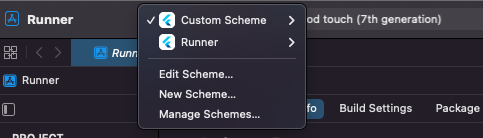
As you may have noticed when saving Scheme we used the save_as method in which we pointed to our project file which may not seem logical. In fact Runner.xcodeproj is actually a directory where the real project files are located.
Soooo, we can see where our Scheme has been saved. If we are in the root directory of our Flutter project we type in the console:
ls ios/Runner.xcodeproj/xcshareddata/xcschemes
And we get the following answer:
Custom Scheme.xcscheme Runner.xcscheme
Conclusion
I hope this post helped at least a little to introduce you to XcodeProject and encourage you to experiment with it. With this tool you can perform practically any action on your Xcode project.
As for our script… It can be extended to automatically add build phases, update Info.plist or delete old build configs.
To write this article I used the knowledge from the documentation (available in the Useful links section), my own trial and error using the tool and an analysis of the files contained in .xcodeproj (mainly project.pbxproj).
Finally, it’s worth mentioning a port of the tool to Dart language which you can find here. I found this package relatively recently so I mention it at the end.
Full code
require 'xcodeproj'

def copy_configuration(project, base_name, new_config_name, symbol_name)
    runner = project.native_targets[0]

    new_configuration = project.add_build_configuration(new_config_name, symbol_name)
    new_native_configuration = runner.add_build_configuration(new_config_name, symbol_name.to_s)

    source_configuration = runner.build_configurations.detect {|element| element.name.downcase == symbol_name.to_s}

    new_native_configuration.base_configuration_reference = source_configuration.base_configuration_reference

    project.build_configurations.each do |configuration|
        if configuration.name == base_name
            new_configuration.build_settings = configuration.build_settings
        end
    end

    runner.build_configurations.each do |configuration|
        if configuration.name == base_name
            new_native_configuration.build_settings = configuration.build_settings
        end
    end

    project.save()

end

debug_conf_name = 'Debug-new'
profile_conf_name = 'Profile-new'
release_conf_name = 'Release-new'
new_scheme_name = "Custom Scheme"
project_path = 'path/to/project/Runner.xcodeproj'

project = Xcodeproj::Project.open(project_path)

copy_configuration(project, 'Debug', debug_conf_name, :debug)
copy_configuration(project, 'Profile', profile_conf_name, :release)
copy_configuration(project, 'Release', release_conf_name, :release)


scheme = Xcodeproj::XCScheme.new

runner = project.native_targets[0]

scheme.add_build_target(runner)
scheme.launch_action.build_configuration=debug_conf_name
scheme.test_action.build_configuration=debug_conf_name
scheme.profile_action.build_configuration=profile_conf_name
scheme.analyze_action.build_configuration=debug_conf_name
scheme.archive_action.build_configuration=release_conf_name
scheme.save_as(project_path, new_scheme_name)